RDS 2012 Web Access Customization
Customizing images and texts
It is easier to replace your logo, background and footer text by following the simple steps below.
Navigate to the folder “c:\Windows\Web\RDWeb\Pages\en-US\theme-assets (Replace the ‘en-US’ with language folder you are customizing now). You can find all custom elements such as logo, background help icon, favicon and Custom Strings.
Replace the logo
Just copy your logo.png file and replace at this location. Make sure your logo image file doesn’t exceed the height of 60px. The width can be anything as you wish.
Replace background
The background file is a JPEG file. Name your background image as bg.jpg, copy and replace the file here. The dimension of 1920 * 906 pixels are good, however you can use any dimension.
Note: It is always good to keep the file optimized (kbs) as possible to keep the pages loading fast.
Replace Favicon
Use a 75 * 75 px .PNG file to replace the Favicon. File name should be Favicon.png.
Replace Help Icon
Help icon can be replaced as well in case if you like to. If so use 22px * 22px image file with the file name of help.jpg.
**The image dimensions we have mentioned are recommended sizes where you can use bigger or lesser sizes than these. Just place images, view on front and make your own assessments.
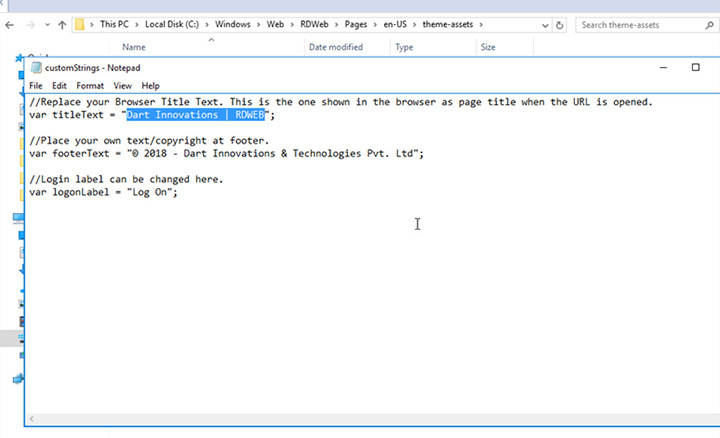
Replace Custom Strings
Open the file customStrings.js in a text editor (Ex: notepad). You can see the values of title text (which is the browser page title), footer text and logon label. Replace these strings with your own.
Important Notes and troubleshoot tips
- We have used ‘c:\’ drive throughout the guide as it is the most common default system drive. You may have your windows installed in a different drive. If so, just replace this with your system drive
- After installation or customization you may feel your changes don’t reflect on the browsers. It may be a cache issue so please do a hard refresh or clear your browser cache.
- As instructed always backup your default interface files before you make custom installation or any upgrades.